Showing posts with label Battery Testing. Show all posts

ZB206+ Battery Tester

I bought this unit from eBay as a DC 5V USB Battery Capacity Tester / Battery Life / Internal Resistance Analyzer.  It's a ZH-YU ZB106+ v1.3, and it's still available from a variety of sources.

Mine is 5v USB powered, though a version exists that runs on straight 12v.  The USB version has a 5v to 12v boost converter for power (the small square labeled "5V--12V").


It's an excellent unit, and I'm quite happy with it!  This is my "go-to" unit for battery measurements now.  A major part of this is because it supports four wire measurement and measures watt-hours in addition to amp-hours, and supports from 0.1A to 2.6A in 0.1A increments.  It's much more configurable than my other units.

As always, if you're interested in such things, read on.


Overview

This is another semiconductor based battery tester, similar to the TEC-02 I tested a while ago.

Instead of using a fixed ohm load, this type of tester uses a semiconductor to drain the battery.  The fine grained control means that if you specify a 1A draw, it draws 1A, regardless of the state of battery charge.  The heat is dissipated in the semiconductor, which has a large heatsink attached to it.

Of the units I've tested so far, this is the highest quality in terms of construction.  The board is well assembled, with high quality solder joints.

It has two connections for the battery battery: Two screw terminals for the discharge current, and a small two pin terminal for use with the four pin test mode.  I'm still not sure what connector style the additional pins are, but I've got something that sort of works.


Manual Translation

The manuals I've found for this unit are very poor.  I'm not even going to bother to try and translate all of it, because it's just pointless.  I'm going to borrow the parts I need and write my own.

http://powercartel.com/teardowns/zh-yu-zb206-battery-tester/ is a most useful reference for this device, and has helped me fill in the missing parts of other manuals I can find.

Specifications

Power supply: 3.5-5.5v, less than 70mA.  Do not use a laptop or desktop for power, use a standalone charger.
Maximum input voltage: 8.5v
Current maximum error: 1%
Voltage maximum error: 1%
Test current: 0.1A - 2.6A, in steps of 0.1A
Maximum capacity: 80Ah or 500Wh

Three Measurement Modes

- Two line batch mode: Cuts off the discharge current during battery voltage detection to prevent line losses from affecting the measurement.  The test cuts the current for a few milliseconds to measure terminal voltage rather than load voltage.
- Four wire mode: With a special fixture, the battery can be accurately tested.
- Internal resistance mode: The unit can detect battery internal resistance with a 4 wire harness.

Supported Battery Types

These are the types recognized in automatic battery detection and termination voltage setting.  It supports 17 battery types in 13 voltage categories.
  • 1.2V nickel-metal hydride nickel-cadmium battery
  • 1.5V alkaline batteries
  • 1.6V nickel-zinc rechargeable battery
  • 1.8V lithium disposable batteries (such as L91)
  • 2.0V lead-acid battery
  • 2.4V Nickel hydride nickel-cadmium battery pack
  • 3.0V lithium battery
  • 3.2V lithium iron phosphate battery
  • 3.6V nickel-metal hydride or nickel-cadmium battery pack
  • 3.6-3.7V lithium (polymer) battery
  • 3.8V lithium battery high voltage (full voltage of 4.35V lithium battery)
  • 4.0V lead-acid battery
  • 5.0V mobile power (USB charging pack)
  • 6.0V lead-acid battery
  • 6.0V nickel-metal hydride or nickel-cadmium battery pack
  • 6.4V double lithium iron phosphate group
  • 7.2-7.4V double series lithium battery pack

Configuration Options

To enter the configuration menu, power the device on while pressing the "SK" button.  If you've done it right, you'll see "LJ 4" on the screen.  To change the options, use "S--" and "S++".  To select the next option, press "SK".  Once you've gone through all the options, you'll be back in the normal operation mode.

"LJ" - Two Wire vs Four Wire

The "LJ" setting is for the tester mode.  If you have only the two main wires hooked up, set "LJ 2" for two wire mode.  If you have a four wire test harness, set "LJ 4" for four wire mode.  Most features work fine in both modes, but accuracy will be somewhat better with a four wire test harness.

"Au" - Automatic Voltage Setting

If the unit is set to "Auon" (Automatic On), it will try to detect the battery type based on the starting voltage, and set the termination voltage automatically.  If it is set to "Auof" (Automatic Off), it will require the user to select the termination voltage before starting a test.

The automatic voltage detection is pretty good - it knows quite a few battery starting voltages (see above), and will probably do the right thing unless you're testing a partially discharged battery

"bE" - Beeper

This sets the end of test beeper to on ("bEon") or off ("bEoF").

"LP" - Limit Power

If this is set to on ("LPon"), the unit will not allow more than 10-12W of power to flow.  In order to exceed this limit safely, a fan must be blowing over the unit.  This can either be a fan powered by the unit, or an externally powered fan.

"SF" - Set Fan

When the power being dissipated is larger than this value (in watts), the fan will turn on.  If it's set to SF00, the fan will always be on during discharge.

In order to use the automatic fan control, connect the proper fan to the incoming voltage, and ground it to the "F-" pin just below the "Run" LED.

Error Codes

Err1: Battery voltage too high.  Ensure battery voltage is below 8.5v.
Err2: Battery voltage too low (below set termination voltage).
Err3: Battery sagging too much - cannot supply requested current.  Ensure the conductors are large and tight, otherwise use a lower current setting.
Err4: The semiconductor is damaged.  Replace it.
Err5: Power limit exceeded (see LP setting above).
Err6: Power supply voltage out of range.

How to Use it


Power it on and insert a battery into your test rig.

You'll see "1.00A" on the display.  This is the discharge current.  "S--" and "S++" adjust it in increments of 0.1A.  Set your desired current.

Press "SK" and if you have automatic voltage setting on, things will start.  If you have automatic voltage setting off, you can now set the cutoff voltage.  It shows what it thinks you should use (perhaps P3.0v for a fully charged lithium cell), and you can adjust as desired.

Press "SK again, and the testing starts.  The "Run" LED comes on to indicate it's discharging.

The display will rotate through four modes:
Ah: How many amp-hours have been provided.
Wh: How many watt-hours have been provided.
V/A: Shows both the current voltage and the current amperage.

"SK" does nothing during the test.

If you press "S--" or "S++" during the test, it will cancel the test and allow you to reset the amperage/cutoff voltage.  However, it resets the measured capacity.  Once this startes testing, you shouldn't muck with it.

Once the battery has dropped to the cutoff voltage, the display will flash to indicate the test is complete.

Press "S--" or "S++" to cycle through the various measurements: Amp-hours, watt-hours, and final voltage.

Press "SK" to reset the unit and start another test.

Internal Resistance Test

If you wish to test a cell's IR, power the unit on while holding the "S--" key.  r000 will show.  If you insert a battery into the test harness, it will show the calculated internal resistance in mOhm (so 056 means 0.056 ohms, or 56mOhm).  If you press "SK" the display will toggle between the measured IR and the current battery voltage.

Capacity Testing

One of my standard tests is to drain a few batteries and see how close the discharge capacity comes to my VC4 charger's charging measurement.

Battery A, 0.5A: 2590mAh discharge, 2621mAh charge
Battery B, 0.5A: 2564mAh discharge, 2587mAh charge

Battery A, 1A: 2619mAh discharge, 2526mAh charge
Battery B, 1A: 2533mAh discharge, 2527mAh charge

The charging puts in slightly more capacity than the discharge (or very close) - the only major (0.1Ah) discrepancy is on Battery A @ 1A.

I'm quite happy with these results.  It's accurate to within my equipment, and certainly matches well to the other devices.

Conclusions

This is a great tester.  Beyond just amp-hours, it gives you watt-hours, which is useful for testing battery capacity at different draws.  It supports a fan for higher power dissipation, and is generally a well constructed unit.

If you need a tester, this is certainly the one I'd buy right now!

My wattemeter arrived! It's crap! G.T.POWER RC 130A Watt Meter and Power Analyzer High Precision LCD 60V GT-Power

Based on a post over at electric-fatbike.com, I ordered a shiny wattmeter/power monitor/etc gizmo for my bike.


It measures everything you might be interested in!  Instant amperage.  Instant voltage.  Instant power (watts).  Peak watts.  Minimum voltage.  Peak amps.  Total power consumed.  It's perfect!

**sigh** So the box says.  Of course, I bought one.  And built it up into a nice system to mount on my stem, running power up from my battery pack.


Excited, I wired this up with 10 gauge wire for minimum losses (Anderson PowerPoles at the end, nice crimp connectors at the wattmeter side), mounted it on my stem (above my blob of DC converter), verified it showed a sane voltage, and set off on a trip (to collect a baby toy)!

I took a 5.8 mile ride to collect some data.  And I got the following data:
1254 Watts Peak
32.50 Amps Peak
35.06 Volts Minimum
2.694 Amp-hours Used
35.2 Watt-Hours Used

Huh.  That's odd.  For people who don't have an EE background, I'd like you to focus on the Watt-Hours Used (35.2Wh), the Amp-Hours Used (2.694Ah), and the Volts Minimum (35.06v).

Watt-hours are easily calculated.  They're watts.  Over time.

Watts are volts * amps.

Watt-hours are volts * amp-hours.

My battery is around 42V fully charged, and on this trip, dropped as low as 35.06v (as measured at the end of a fairly long run of 10 gauge).

Based on the data, my watt-hours used should have been between ~113Wh (42v) and 94.5Wh (35v).

35.2Wh is right out.  That's not even close.  It's not remotely right.  It's impossible.

The display also isn't very easy to read in most conditions.  It's OK at night, but I could not find a good position for it with sunlight.

I took some other rides, and the watt-hours reading is consistently wrong.  I don't know what's wrong with it, but it's just flat out wrong.  Period.  It's flat out impossible, given the voltage and amp-hours measured by the unit, unless you redefine most of math.

I've found other reviews mentioning the same problem with some of these units, and people generally consider them to either be very nice, or somehow broken.  They're not particularly reliable, either.

So, if you want a wattmeter for your ebike, or for anything else, I wouldn't go with this one.  Spend a little bit more on something higher quality.

At least I was able to get my money back from the seller.

TEC-02 Ver 3.0 Semiconductor Battery Tester

This is the first of my semiconductor based battery testers.  It's a TEC-02 Ver 3.0 unit.

I purchased mine on eBay as a 5V Lithium Li-ion LiFePO4 NIMH Battery Capacity Tester Voltage Detector Analyzer.  $11.58 shipped - not half bad for a semiconductor based unit!


As usual, I'm going to dive into translating the manual, then do some analysis on it.


Manual Translation

100% Brand New and High Quality

This is a battery capacity tester, and cannot instantly detect the battery capacity.  The detection takes time.  The battery needs to be fully charged before testing, and the test time is equal to the battery capacity divided by the discharge current.  An instant battery capacity detector does not exist.

In order to be an accurate battery capacity detector, you need three things:

  • Actual current is accurate.
  • Timing is accurate.
  • Termination voltage is accurate.

TEC-02 Battery Capacity Meter's Five (really six) Characteristics:

  1. You can select the discharge current: 0.5A, 1.0A, 1.5A.  You can switch between these during testing without losing your measured capacity.
  2. You can display the battery voltage, battery capacity, and discharge current.
  3. The tester supports five kinds of batteries: NiMH/NiCd, Lithium Iron Phosphate, Generic Lithium Ion (~3.7v), Portable Power (USB phone chargers), and a custom voltage (default set for 12v lead acid).
  4. The tester runs on a mini USB port (note: Not micro USB like others - mini!).  Use a standalone charger to power it, not your computer.
  5. The voltage can be calibrated.
  6. Size: 92x54x42mm.

Operating Details

There are two current selection jumpers: 0.5A and 1.0A.  If both are selected, the current is 1.5A.  This can be switched without resetting the unit.

The digital display has three states: AH (capacity), V (battery voltage) and State (if it's happy or unhappy) - select by pressing the "Display Mode" button (the left one) to switch modes.

In AH display mode, the minimum value displayed is 0.001AH (1mAh), and the largest value is 60AH.  The precision is determined by the decimal point.

In V display mode (right most symbol "U" or "V", if you imagine), the battery voltage is displayed to three significant digits.  The measurement accuracy is 1%, and when the battery is being discharged, the voltage is the open circuit voltage.  If you measure the battery with a voltmeter during discharge, it will be lower than displayed, but if you pause the detector, the voltages will match.

Device States

In STATE mode, there are six codes that can be displayed.  Four are fault codes, one is an end code, and one is a "all is good" code.
END: End of measurement after the value appears.  Press start/stop for 2s to clear the capacity value and reset.
JP-1: Multiple battery types are jumpered.  You can only pick one battery type!
HI-V: Battery voltage is too high for the selected battery type.
LO-V: Battery voltage is too low for the selected battery type.
LO-A: Battery current is too low - cannot provide the requested current.  Press start to reset.  If the battery still provides this fault at the 0.5A setting, the TEC-02 tester cannot test it, and you should consider the battery damaged.
GOOD: Normal code, everything is awesome!

Battery Types

There are five kinds of batteries, selected by the jumper.  From top down (starting voltage - ending voltage):
NiMH/NiCd (1.6v-1.0v)
LiFePO4 (lithium iron phosphate) (4.0v-2.5v)
Lithium Polymer (standard LiCo & associated) (4.5v-3.0v)
Mobile Power (USB battery packs) (6.4v-4.0v)
No jumper: 12v Lead Acid (14v-11v)

Calibration

Calibration is rather non-intuitive.  Press and hold "display" while powering the device on to cycle through available calibration settings (have a battery and voltmeter handy while doing this).  There is no indication what setting you're on other than the voltage indicated.

There are N settings.  With a battery that shows 4.16v, it cycles through 5 displayed voltages:
4.12v, 4.16v, 4.19v, 4.22v, 4.26v.

I believe that these are -3%, -1.5%, 0%, +1.5%, and +3%, based on documentation.

How to Use

  1. Connect the battery.  There is reverse polarity protection.
  2. Select the battery type with the left set of jumpers (use the above table).
  3. Set the current (0.5A, 1.0A, or 1.5A).
  4. Press the "Run/Stop" button to start.  If it doesn't start, press "Display Mode" to show the errors.  If you see errors, correct them until you see "Good."  The display will update as you change the jumpers.  Then press "Run/Stop" to start.
  5. The default display is AH (battery capacity).  If you want to monitor voltage (unloaded), press "Display Mode" to toggle through AH - V - STATE.
  6. When the tests are complete, the "END" code appears.  AH mode shows the battery capacity.  Press "Start/Stop" for 2s to clear the value and codes and start a new test.
  7. During the test, the LED in the lower left corner will flash, proportional to the discharge rate.  When the test is done, it will be on steady.

How it works

This device controls the battery discharge current.  The current is always at the set value, not based on the battery voltage (as a resistance based device is).  If the battery has too high an internal resistance, the battery may not be able to provide the specified current.  If this is the case, the device will prompt the user.

The microcontroller tracks the discharge time.  During the discharge cycle, the system will pause for a moment to measure the open circuit voltage on the battery.  This pause is less than 0.5% of the discharge cycle.  After the open circuit voltage drops to the lower limit, the test ends.

Measurement Accuracy

Voltage: 1%
Current: 1%
Capacity: 2%

General notes

Battery tests at low currents will typically have higher capacity than at high currents.  This is due to the battery reactions not being able to keep up and causing low voltage shutdown.  This is not a problem with the instrument.
If your battery has a protection circuit, the open circuit voltage may measure above the cutoff voltage while the actual battery voltage under load drops below the protection cutoff point.  This will cause the protection board to shut the current off, and the TEC-02 will terminate measurement at this point.
After the test finishes, the battery voltage will rise.  This will be higher than the termination voltage.  A good check is what the battery voltage is ~10s after termination.

Power Handling

The radiator can handle a maximum of about 10W.  While you could select 1.5A of current with a 12v battery, this would radically exceed the heat sink capabilities, so only select 0.5A.  Caution: Heat sink will get hot.  Use a fan.  There is a fan header, but I've not played with it.


Syonyk's Guide to The TEC-02


This is a simple device to use, if you ignore the writing on it and memorize how to use it.  Or just don't mess with the settings often.

The jumpers control your battery cutoff voltage and amperage.  The left side is your battery type.  Voltage goes up as the jumper goes up.  The right side is your amperage.

From the top down:
USB chargers (4.0v cutoff)
"Standard" Lithium (3.0v cutoff)
LiFePO4 (2.5v cutoff)
NiCd/NiMH (1.0v cutoff)

For 12v batteries (cutoff set to 11v), just remove the jumper entirely.

Set your amperage with the jumpers (they sum to 1.5A if both are installed).

The left button toggles between AH, voltage, and state (Good, End, Error, etc).  The right button is the start/stop button.

Once you have everything set up properly, tap the Start/Stop button.  The unit will start testing as indicated by the lower left light flashing.  The display button will toggle between AH, unloaded voltage, and state.  The voltage will update roughly every 8s.  You want to see "Good" on the status display.


Analysis

Voltage Accuracy

I calibrated my unit at the 0% setting, since this seems closest with a discharged battery.

At the calibrated voltage, it's accurate.  It shows 3.35v against my voltmeter's 3.346v.  Close enough!

With a fully charged battery, though, it's reading high.  With the same calibration, my meter reads 4.15v, vs it's 4.20v.  Ouch.  0.05v.

If I recalibrate at the high voltage setting, I get the following (at the -1.5% setting):
Meter reads 4.16, unit reads 4.16.
Meter reads 3.365v, unit reads 3.34v.

I'm disappointed that I can't have accuracy at both ends like most of my other testers.  Not good.  However, you should calibrate at the bottom end, with a discharged battery, since the only important thing this tester does with the voltage is the cutoff.

You should definitely check this unit with a voltmeter.  It's close enough that it's not the end of the world (it's not off by half a volt or anything), but... double check anyway.  0.05v is still 0.05v, and we can do better in 2015.

Unloaded Voltage Measurement

One interesting aspect of this unit is that the voltage shown while testing is the unloaded voltage of the cell.  I set out to understand this, because how it does this is important - pulsing the battery aggressively is bad.  However, this unit seems to do it properly!  During testing, about once every 7 seconds, for a brief period of time (0.2-0.3s, maybe?) it unloads the battery and measures the voltage.  This unloaded voltage, not the loaded voltage, is what it uses for cutoff calculation and such.

Towards the end of the battery's discharge, if you're watching the voltage display, you'll notice it only updates every 7-8s.  That's the unload and measurement interval.

This seems quite reasonable, and is the generally accepted way of checking ending voltage, as near as I can tell.  Excellent!

Capacity Tests

I ran my two test 18650s through this unit, then noted the recharge capacity with my XTAR VC4 charger.  I'm not very impressed.

Battery A

0.5A: 2643mAh, recharge 2623mAh.
1.0A: 2690mAh, recharge 2607mAh.

Battery B

0.5A: 2657mAh, recharge 2666mAh.
1.0A: 2687mAh, recharge 2651mAh.


I would expect to see more capacity out of the batteries at the 0.5A drain than at the 1.0A drain.  You'll note that, for both batteries, this unit reported a higher capacity for a 1.0A drain than the 0.5A drain.  In contrast, the charger put slightly more into the batteries after the 0.5A drain than the 1.0A drain.  The charger matches what my other units do.  This tester does not.

I will at least grant that the measured capacity in the ballpark with all the other testers, but that it reports a higher capacity at higher drain, in contrast to what other testers and the charger reports, indicates it's not that accurate.

There's no good excuse for this, sadly.

Conclusions

There's no good reason to buy this tester.  It's not utterly wrong, but it's inaccurate in enough ways that I have no real confidence in the answers it gives.  It will give you an answer.  Just probably not a right answer.

You can do better.  Don't buy this unit.

ZB2L3 v2.0 ZHIYU battery tester

I've got another battery tester to play with!  This tester is a ZB2L3 v2.0 by ZHIYU.  It's rated for a max of 15v, 3A, and 9999AH - so you can test your 12v lead acid batteries with it, if you care.

It looks something like this:


Mine came from eBay as a 1.5v~12v Battery Capacity Meter discharge Tester 18650 li-ion lithium lead-acid.  $7.98 shipped - not half bad!


The manual for this board is surprisingly readable.  It includes error messages, and also has a calibration mode (of which I don't have sufficiently precise hardware to actually use right now).

Manual Translation

1.5v-12v Battery Capacity Tester External Load Discharge Capacity Test 18650 (yes, this is keyword spam).

Operating Parameters

Power supply voltage: DC 4.5-6V (micro USB)
Working current: Less than 70mA (I assume this means for the micro USB interface)
Discharge voltage: 1.00-15.00V, resolution 0.01V
Termination voltage range: 0.5V-11V (precision 0.1V)
Current range: Max 3.000A, resolution 0.001A
Maximum voltage error: 1%+0.3V
Maximum current error: 2%+/- 0.010A

The board will show the battery capacity up to 9999Ah.  The decimal shifts to indicate proper units.

Note: This circuit is designed with a DC bias to improve voltage measurement accuracy.  When the terminals are not connected, the unit will display a small voltage (0.06v on mine).  This does not affect the actual measurement.  If you short the input terminals, the unit will display 0v (mine does).  To understand this principle, consult the superposition theorem in electrical engineering.

Method of Use

  1. Fully charge the battery you're testing.
  2. Connect the battery under test to the input terminals (center terminals) in the proper manner.  This device may be damaged by reverse polarity.  Connect the load to the proper (outer) terminals, and connect the micro USB power (do not use a desktop or laptop - use a standalone cell phone charger).  The battery voltage will be displayed.
  3. To start the test with the automatically determined termination voltage, press the "OK" button.  The display will flash the termination voltage 3 times and begin testing.  If you wish to set the termination voltage yourself, press "+" or "-" to modify the termination voltage as desired, then press "OK" to start the test.
  4. The tester connects the battery to the load, and displays the capacity (Ah), discharge current (A), and battery voltage (V), cycling the display through each.  When the battery voltage reaches the specified termination voltage, the battery is disconnected, and the display shows the capacity (Ah) with a rapid blinking to indicate the test is done.  Press "OK" to solidly illuminate the display with the capacity, then press "OK" again to reset the unit for another test.

Error Codes

Err1: Battery voltage greater than 15v.
Err2: The battery voltage is lower than the specified termination voltage.
Err3: The battery is unable to withstand the discharge current (too much sag?)
Err4: The discharge current is >3.1A.

Calibration Operation

(I have not attempted calibration.  This is my best attempt to translate the instructions.)

To enter calibration mode, press all three keys when the tester is powered on.

The unit will display 0u0A.  Short the input positive and negative terminals and press OK.

The unit will display J10u.  Apply 10.00V to the positive and negative inputs and press OK.

The unit will display J2.0A.  Apply a constant 2.0A DC current across the unit (short the load, perhaps?  I'm not sure how to hook this up) and press OK.

The unit will sanity check the calibration data.  If it likes it, it will show 4 calibration numbers after existing, otherwise it will discard it.


Syonyk's Quick Operation Guide

Connect a battery and a load.  Plug it in.  Press "+" and "-" to adjust the auto-detected cutoff voltage (which usually will be close to what you want).  Press "OK."

It cycles through Ah, A, and V while running.  Caution: Your resistors will get hot.

Wait until it's done and flashing to see the final capacity.  It's really, really straightforward to use.

Analysis

This is a very simple testing unit, and it's reasonably flexible.  It has an connection for a battery, and a connection for a load.  What you do with these is up to you, as long as you stay within the 15V/3A limits.  This allows for a great amount of flexibility in testing, assuming you're willing to change the loads around or create your own custom load banks for the unit (though be aware of the 3A limit - you can't put too much load on a battery through this unit).

It doesn't do anything fancy - it pretty much just counts coulombs and displays voltage.  Which, sometimes, is just what you need.  Nicely, you can use this with a +5v PSU (so a USB power bank), or a 12v battery, or pretty much whatever you want - just set the cutoff voltage properly before you start.

Unlike another tester, this one doesn't pulse the battery or anything unexpected - it just sits there, drawing current, until the battery hits the cutoff voltage.  This is a very good thing. :)  The downside is that using a resistive load means the amperage drops over the discharge (Ohm's Law and all), but the flexibility of being able to use "pretty much anything" as a load is worth a lot!

Voltage

It's pretty good.  It reads a bit high when unloaded, but this is noted in the documentation and it seems to drop down to reflect reality when loaded.  As it's not doing anything fancy except cutoff voltage, it's fine.  I have no real complaints here.


Testing Results

I've run my 18650s through this, as I have with other devices.  Amperage drops over the test as the voltage drops, as is expected for a simple ohm's law device.  But, I'm just looking for something sane-ish out of the values.

7.5 Ohm Resistor (0.54A-0.41A)

Battery A: Discharge: 2695mAh.  Recharge: 2689mAh.
Battery B: Discharge: 2708mAh.  Recharge: 2620mAh.

3.75 Ohm Resistor (2x 7.5 ohm in parallel) (1.06A-0.81A)

Battery A: Discharge: 2633mAh.  Recharge: 2621mAh.
Battery B: Discharge: 2661mAh.  Recharge: 2702mAh.

This tester reasonably shows slightly less capacity at a 1A discharge vs at a 0.5A discharge, so that's good.

Conclusions

This is a pretty handy tester to have around.  Not only does it handle individual cells, it will handle packs and 12v batteries and such - keep it below 3A, and you're good!  You will want to grab some different resistors, if you're testing higher voltage batteries, but a decent set of resistors and this will handle an awful lot of your needs.

And it's, like, $8. :)

That said, you can do better if individual cell testing is your goal.  This would be a nice pack tester, and a handy tool, but I wouldn't suggest it for individual cell work.

Chinese BTY AA3000 NiMH batteries vs Energizer Recharge: A Review

In this photo, I have a Chinese BTY brand AA battery, AA3000 series.  It's rated at 3000mAh (according to the websites selling it - it doesn't actually list capacity anywhere on the cell), and costs about $0.50 retail.


In this photo, I have an Energizer Recharge rechargeable NiMh battery.  Same physical size (AA), rated at 2300mAh, and retails for around $1.50 or $2.


Shall we dare to compare?  I think we shall!  Read on for details of how crappy the Chinese batteries are...


Specs

I can find detailed specs for the Energizer Recharge 2300mAh batteries.  They're right here.

Specs, for the BTY batteries?  Lol.  "Up to 3000mAh capacity!" or something is as good as you're going to find.  I'd note that 3000mAh is greater than the highest "honest" batteries out there, the Eneloop Pros, at 2550mAh.

Weight

It takes stuff to store energy.  Let's see how much stuff is in them!

BTY AA3000: 16g
Energizer Recharge: 28g (Energizer claims a typical weight of 30g, and my scale is cheap, so... it's probably fine)

Those Chinese manufacturers are really onto something here.  At 57% the weight of the Energizer, they're providing 130% the capacity!  Assuming, of course, that they work as rated.  I'll let you guess what disappointment might lie ahead...

Capacity

I'm testing these batteries at a few different current draws: two discharges at 0.5A, two discharges at 1.5A, and for fun, two discharges at 2.5A.  I also make a note of the initial voltage observed during the discharge.  The discharges cut off at 1.0v.  The batteries came right off my VC4 charger - so 100%, fully, freshly charged (NiMH has a rather high self discharge rate).

NiMH batteries are generally regarded as being good for high drain devices, since they hold capacity at higher drains than your normal alkaline batteries.  Assuming 2000mAh actual capacity, 0.5A is 0.25C, 1.5A is 0.75C, and 2.5A is 1.25C - reasonable discharge rates for NiMH batteries in fairly high drain devices.  Energizer has charts for their batteries up to 2C discharge rates (4.6A), but the highest I can currently sink is 2.6A, so... I can't quite test them up there yet.

Tests are performed with a four wire battery holder and my ZB206+ tester (review of that unit later).  I'm also logging calculated watt-hours for fun.  And for science.

Let's see how they do.

BTY AA3000, 0.5A

Test 1: 1.33v, 277mAh, 327mWh.
Test 2: 1.33v, 313mAh, 368mWh.

BTY AA3000, 1.5A

Test 3: 1.23v, 110mAh, 119mWh.
Test 4: 1.23v, 66mAh, 73mWh.

BTYAA3000, 2.5A

Test 5: 1.23v,  93mAh, 102mWh.
Test 6: 1.23v, 197mAh, 202mWh.

Ouch.  They don't even come close to meeting a reasonable capacity for an AA battery.  They don't even come near the capacity of a decent AAA battery.

Notice that the capacity is all over the place as well, even at the same drain.  This is really bad - it means that if you put the batteries into a series pack (so, pretty much anything, ever), you stand a very good chance of over-discharging the weakest battery.

Energizer Recharge, 0.5A

Test 1: 1.39v, 2079mAh, 2523mWh.
Test 2: 1.37v, 2044mAh, 2474mWh.

Energizer Recharge, 1.5A

Test 3: 1.36v, 2058mAh, 2415mWh.
Test 4: 1.35v, 2022mAh, 2371mWh.

Energizer Recharge, 2.5A

Test 5: 1.37v, 2125mAh, 2467mWh.
Test 6: 1.35v, 2111mAh, 2451mWh.

Much better.  There's some variance, and I'm a bit surprised that the measured capacity at 2.5A is greater than the lower amperage tests, but the batteries come in at a reasonable capacity for a 2300mAh rated battery.  I suspect if I tried an 0.1A draw or something, in perfect temperature conditions, they'd hit it.  Also, there's some amount of tolerance in my tester.  But, the difference between these and the BTY cells is absolutely astounding.

Internal Resistance

I also tested the internal resistance, before and after discharging, with my shiny 4 wire ZB206+ tester.  Values are sorted in increasing order.

BTY AA3000, Fully Charged

30mOhm
31mOhm
31mOhm
32mOhm (after dropping from about 70 over 10 seconds)

BTY AA3000, Discharged

30mOhm
34mOhm
34mOhm
35mOhm
42mOhm
55mOhm (!!)

Energizer, Fully Charged

18mOhm
18mOhm
19mOhm
18mOhm

Energizer, Discharged

22mOhm
24mOhm
25mOhm
25mOhm
26mOhm
29mOhm

Conclusions

Well, what did you expect from cheap Chinese batteries?  They're junk.  Utter and complete crap.  Some smart chargers won't even charge them, they're so bad.

They're lucky to hit 10% of rated capacity under a light load, and capacity is all over the place.  They're radically lighter than batteries that make a good effort towards rated capacity, their IR is 50% greater (which affects voltage drop under load) and variable, and even for the cost, they're not worth buying.  Really, they're not even worth it for free.  You'll be changing them constantly, even on incredibly low drain devices.  Just say no and buy some decent batteries.

On the other hand, the Energizer batteries seem quite solid.   They're certainly no Eneloop, but if you can get them for under $1.50/cell, they're definitely quite nice batteries for general use!

Digital Lithium Li-ion NIMH Battery Capacity Tester Voltage Detector Discharger v 1.1.SP 2013/4/1

Let's say you want to measure the capacity of some sort of battery.  You've found something that looks exactly like this on a website that sells things, and want to know if it's any good - and also wouldn't mind a manual written in something that faintly resembles readable English.


Excellent!  Hopefully I can be of some use.

This post is the first of what I intend to be a series of battery testing device testing.  I've got a bunch of these things showing up, and intend to review and test them, ideally finding the best cheap battery tester for my needs.

This particular tester is a somewhat sophisticated resistor-based battery measurement device.  It dumps the battery into a resistor, and measures the current.

Mine came from eBay, and was sold as a Battery Capacity Meter discharge Tester 18650 li-ion lithium +PC online function.  I paid $14.52 shipped for it.

The instructions on the website selling it (often eBay) are some quality Google Translate jibberish.  I'm going to attempt to translate the important parts, and then try to test it out and see how it works.

If you're interested, read on.  If not, feel free to skip the next post.  This is pretty esoteric.  However, I did have an excuse to drag out my old oscilloscope, so there's some great vintage oscilloscope photos in here, if you like such things.


Below my attempts at an actual translation of the provided manual are my operating notes.  You may wish to simply skip to these.

Translation Attempt of the Provided Instructions

If you're buying one of these, you've run across the instructions.  They're nearly unreadable.  I've tried to translate them into something that keeps the spirit of the originals, though there exist parts I literally could not figure out.

Warnings & Notes Before Purchase

  1. This product (being sold for $11, shipped) is not a professional device.  It may be wrong.  But, it's probably fine.
  2. The battery capacity will vary with temperature, age, and different discharge rates.  Using silver plated wire will reduce resistance.  Ordinary battery cases have a high resistance.
  3. This is not a charger.
  4. If you are measuring 18650s with a protection PCB, the included battery box will not work.  Use a test stand.
  5. Be sure to use a large wire to connect the battery.  22 gauge or larger copper is recommended.
  6. Brand new batteries are not fully charged - you must charge new batteries before use.  A full battery will be 4.2v, and if it shows 3.8v, it is definitely not charged.
  7. Use a standalone USB power supply to power this device (cell phone charger or such).
  8. The unit must discharge the battery to test it.  It is not an instant test.
  9. The tests will take some time.  It runs at a maximum of 1A discharge, so a 3000mah battery will take 3 hours to discharge fully.

Features

This product requires a 5v micro USB power source.  This product can test lithium batteries, nickel metal hydride batteries, and lithium iron phosphate batteries.  It also measures internal resistance.  Maximum voltage 5V.

Operating Details

If the battery is 10AH or larger, hold down K1 before plugging in the micro USB power.  "Hcon" will be displayed, and the unit will show up to 65AH capacity.  Instead of showing NNN.N mah, it shows N.NNN AH (and probably moves the decimal as things go).
  1. Insert a fully charged battery in the battery box, or otherwise connect it to the terminals on the device.
  2. Plug in the micro USB cable.
  3. The unit will show the battery voltage.  For a lithium battery, the closer to 4.2v it is, the more accurate the measurement (assuming your cells are fully charged at 4.2v and not 4.35v).
  4. Press the K2 key, and it will show the expected discharge voltage.  Ensure this is correct.
  5. Don't put this near anything that burns!  It gets hot!  A metal plate is fine.
  6. The unit will automatically discharge, showing the capacity on the LCD display.  When the four numbers are flashing, the discharge is ended, and the number on top shows the battery capacity.  (It seems there is some way to mess with the termination voltage yourself, though I haven't found it)
If the voltage of the battery bounces back significantly after terminating the discharge, the battery is probably no good (it has a high internal resistance).

Don't overcharge lithium batteries or they'll blow up (duh).

Press K2 to begin discharge.  The unit will show capacity in mah as it measures.  Details on the rest of the operation below.

A long press of K1 will show equivalent resistance.  Good batteries show around 80 milliohm.  The battery compartment resistance will be less than 50 millohm, so you can calculate the actual battery resistance from this.

Termination Voltages

General starting voltage ranges (experimentally determined by me), the indicated symbol, and the termination voltage:
V > 3.6: Ld, 3.0v cutoff (lithium, normal 4.2v charged chemistries)
V > 3.0, V < 3.5, Fd, 2.5v cutoff (lithium iron phosphate)
V < 3.0, V > 1.5: Hd, 1.2v cutoff (nickel-zinc)
V < 1.5: Hd, 1.0v cutoff (nickel metal hydride)

FAQs

  1. U_L: Low voltage.  Check your wiring or your voltage.
  2. Charge the batteries to 4.2v before starting.
  3. The lower the termination voltage, the more power is released.
  4. Alligator clips are not great - the resistance is too high.
  5. Putting the battery in backwards will not fry the board, as it has diodes.
  6. The resistor gets hot, but does not need an additional heatsink.  Do not short the contacts, or you'll burn out the tester.  The cement is rated to 150 degrees (F? C? probably C) for many days.
  7. Your maximum input voltage is 5.0v - you cannot test lithium packs.
  8. You can measure AA & AAA batteries.  Somehow.  It involves changing programs and I cannot make sense of it.

Syonyk's Operating Manual

Alright.  You want to actually know how to use this thing, in plain English?  Here's the quick guide.

Setup

Battery goes in the battery holder.  Or, connect your own preferred battery holder.  Note that you should probably tighten the contacts when you get it to make sure they're fully seated.  Use a cell phone charger for steady USB power - apparently many computers emit dirty power that messes up somewhat precise measurements.

Power On Settings

Put a battery in or otherwise connect a battery, and plug the USB power in.  The unit will display 0000, then the voltage (briefly), then the battery type detected and cutoff voltage (probably Ld30 for lithium with a 3.0v cutoff), then go back to the voltage display.

If you're testing something >10AH, hold down K1 while powering the unit on.  It will display Hcon and measure in AH instead of mAH.  If you hold down K2 while powering it on, it does something else, and I have no idea what.

In this state, K1 (the left button) will toggle discharge amperages.  For a lithium cell, your options are 1.00A, 0.50A, 0.33A, 0.25A.  Lower voltage batteries offer a some lower amperage settings.

Start Testing

Press K2 (the right button).  The display will show the battery type and cutoff voltage (Ld30), the amperage selected, and then go to the main running display.  This will count up in mAH or AH, depending on how you powered the device on.

Mid-Test Controls

While the test is running, there are several options.

The mAh or Ah display is the "home" display.  Pressing the right (K2) button will show the battery voltage.  Long pressing K2 will terminate the test (with the message OFF.1).  Note that if you terminate the test, the capacity is saved, so you can change the amperage and resume.

Pressing K1 (the left button) will show you the current cutoff voltage.

Long pressing K1 rotates through the home display, a "load voltage" display, and the calculated internal resistance of the battery/holder combination (rNNN).  From either the load voltage or the IR display, pressing K2 will show you a voltage that I cannot yet figure out.

Test Over

When the digits flash, the test is over (the battery has dropped to the cutoff voltage).  

Pressing K1 will show you the set cutoff voltage.  Long pressing K1 will show you the calculated internal resistance.

Pressing K2 will show you the resting voltage of the cell.  Long pressing K2 will reset things.

I hope this is a slightly clearer set of directions than what comes with it...

PC Serial Link

It comes with one.  I have the software, but am a little bit hesitant to run random Chinese-provided software on anything I own.  I also can't read the directions or even the folder names, as I don't read Chinese.  If you're interested in analyzing it, please let me know.

Comments & Analysis


Accuracy

Right now, I don't have any sort of high quality current source equipment - so I'm just going to test a few brand new 18650 batteries and see how it goes compared to other equipment.

During some initial testing with a variable power supply, the voltage shown matches my voltmeter exactly - this is a good start!


Some fiddling around with my power supply indicates that it also does a decent job with the amperages - more or less.  And, if I'm honest, I don't trust my power supply readout very much.  So it's probably fine on the average amperages drawn.

How does it actually work?

This is clearly a more sophisticated device than some.  It allows you to set the discharge amperages, and it seems to hold them decently enough.  It's capable of handling a wide range of battery voltages as well, from ~1v up through ~5v - so it can't be a static resistance involved.  And you can't change the resistance - the load resistor is soldered in place.

The load resistor is obvious.  It's large, cemented, and gets really very hot during testing unless you have good airflow over it.  According to the manual, it's fine to let it get hot, but I don't like really hot things, so I just stick it in front of one of my window fans when I'm running a higher current through it.  0.25A is usually fine in free air, but unless you want to be very careful about what it's sitting on, airflow is needed for 1A discharges.

The board doesn't get hot, so it can't be regulating power that way.  The only logical choice left is for the board to be doing some sort of rapid switching of the battery to the load, and to modify this switching duty cycle based on the voltage and desired amperage.

Fortunately, rapid switching of voltage is just the sort of thing an ancient analog oscilloscope is perfect for!  And, if I look in my closet - I've got one!  It's an old B&K Precision Model 1470 - dual trace, even!  Good to 10Mhz.  It's properly vintage, but it gets the job done.  I'm not actually sure how old it is, but I'm confident it's older than me, by a lot.

So, let's hook it up and take a look to see if what I think is happening is actually happening.

First, I'm going to monitor the voltage on the load.  I suspect, very strongly, that the load is switched on/off aggressively with something close to a square wave.  It's the only thing that makes sense for doing this.

To do this, I hook up my ground reference to one side of the load, and my probe to the other side.  I'm guessing that the voltages will match the input sides, since it doesn't make sense to have positive and negative crossing on the board (not that it matters).


0.25A, 18650@4v

Fire up the tester at 0.25A with a fresh 18650 in it, and... heyo!  That looks like a square wave to me!  A little bit of overshoot, but what do you expect for $10?


Current settings: the sweep time is set to 2ms/cm (each square is 1cm), and the voltage is effectively 1v/cm (10:1 on the probe, 0.1v/cm... it works out).

I've adjusted the vertical offset slightly to make everything fit on the display.  Vertically, the ~4v on the load is almost exactly the battery voltage, so that's good - the switching is just turning the battery-to-load connection on and off.  Horizontally, the cycle time is 10ms - 5 squares at 2ms/square.  That means the unit is cycling at just about 100hz.  I doubt there's any significance to this beyond "It's a convenient number.".  It's running around a 15-18% duty cycle to get 0.25A out of this battery.

Just for fun, I zoomed out to 5ms per cm, and this is what I get: Yes, it's clearly cycling at 100hz.  And I swear I had it adjusted to line up with the grids properly.  Parallex error with photography.  Still cooler than a bland PNG from a logging oscilloscope.


I'm also really interested in what this is doing to the battery voltage.  So, to check this out, I move the scope leads over to the battery terminals on the box (closer to the battery, better reading than the board size of the leads).  Alligator ground clip on the left, test lead on the right.


It looks something like this (same settings as above):


You can clearly see the switching going on with the battery voltage as well.  It drops, as expected, when the load is switched on.

What's interesting, though, is that it's loading the battery up with the full current based on the resistor, for relatively long periods of time.  I'm going to come back to this later - but it probably matters, a lot.

The "load" voltage displayed by the tester during discharge seems to accurately represent the loaded voltage, with the non-load voltage being the voltage when it's not loaded - so as near as I can tell, these two readouts are accurate.

1A, 18650@4v

On the other end of the amperage range for lithium batteries is the 1A setting.  Taking the same measurements as above, I get the following displays (and a beautiful, beautiful oscilloscope - this is how you do a science properly).

The load voltage looks as one might expect, at about a 60% duty cycle.


And the battery voltage does about the same thing as above.  Look, ma!  I learned to use the vertical offset knob!  Also, notice that the voltage offset looks the same as in the 0.25A graph.  Since it's just switching on and off, that's to be expected.


The problem with pulsed testing

So: Here's the problem with how this charger does it's testing.  It's always draining the battery at the maximum supported current by dumping it through the resistor, and it's toggling this connection on and off to achieve the target average current.  But, as near as I can tell from my fairly extensive reading on batteries, this just doesn't matter.  Pulsing a battery with high power draw is still pulling a lot of amps out, and you derate capacity based on the peak pulse amperage - not the average.  So, if you select a lower amperage, it's still draining the battery at the maximum rate, just giving it a break between these pulses (100 pulses a second).  But you're still pulsing the battery.

With 1A being a 60% duty cycle, the current draw under load is around 1.6-1.7A.  Always.  No matter which current setting you select.

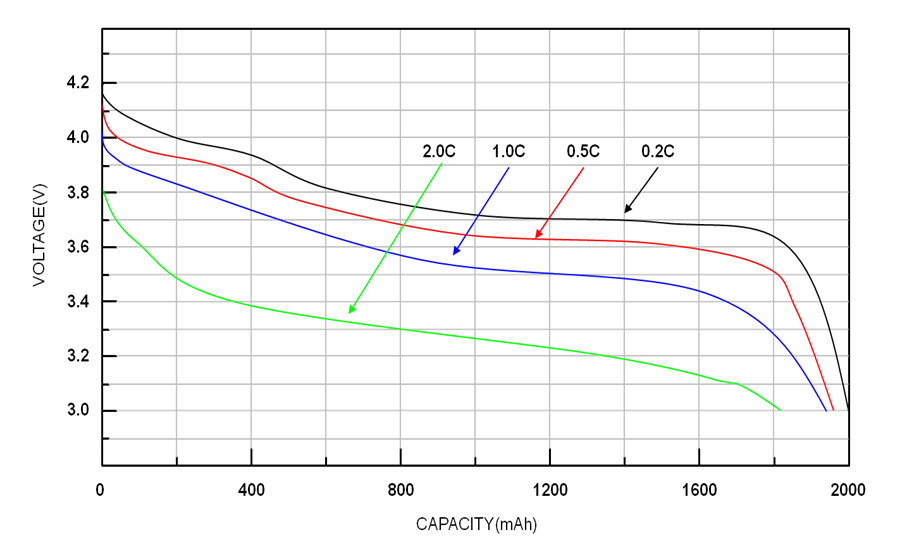
If you look at the discharge curves below (for a suitably random lithium cell), notice that at higher draws (higher C rates), the voltage is lower (which I don't care about for capacity testing), but the final capacity is different as well.  You get less capacity (fewer amp-hours) out of a battery when testing with a higher current, and varying the pulse width of the high current pulses shouldn't change this much.

How big of a difference does this make in practice with modern lithium cells?

I'm not sure.  That's why I decided to test it!

Fortunately, I've got a few spare LiCo 18650s laying around - brand new, never used.

These are 3200mah cells (nominal), though I'm not fully charging them (they top off at 4.35v instead of a more normal 4.2v, and I don't feel like pushing them - also, my charger won't push them past 4.2v).

A draw of 1.0A is a 0.3C rate, with 0.25A being a 0.08C rate.  I don't have anything that can push them closer to 1C (yet).

My radically involved test procedure: drain them at 1.0A and 0.25A settings, and compare the capacities.  They're all starting with just under 4.2v, and the low voltage cutoff is set to 3.0v.

I then recharge them with my XTAR VC4 charger, and record the recharge current.  I'm not expecting them to match perfectly, because there's inefficiencies in charging, but they should be in the same ballpark, and give me a nice sanity check on the results.

Test Results

Battery A, 1A: 2649mah (drain), 2634mah (charge)
Battery A, 0.25A: 2694mah (drain), 2665mah (charge)
Difference: 1.67% (drain), 1.1% (charge)

Battery B, 1A: 2666mah (Drain), 2661mah (charge)
Battery B, 0.25A: 2671mah (drain), 2698mah (charge)
Difference: 0.2% (drain), 1.4% (charge)

The capacities are pretty close.  However, I don't have a good way to compare these to better discharge testers - yet.  Once I have other devices that get me better data, I'll revisit these numbers and provide better data on how much this matters.  There definitely is a little bit more capacity extracted at the 0.25A drain, but less than I was expecting.

Internal Resistance/IR Testing

One really slick thing about this tester is that it can test internal resistance/IR of the battery.  Internal resistance is related to the voltage drop measured as the battery gets loaded up.  An "ideal" battery would never drop voltage as current increases, but in reality, they do.  The IR is the resistance that, paired with an ideal voltage source, would create the observed behavior.

By using the difference between the loaded and unloaded voltage (which it's pulsing rapidly between), it can (attempt) to calculate the internal resistance of the cell.  However, since it's only a two wire system, what it's actually calculating is the internal resistance of the cell plus holder plus wiring plus contacts.  If this is low, or known, it can get a decent number for the battery's voltage drop during testing.  A better system would be a four wire system (separate sense lines for voltage at the battery terminals), but if your wires are short and low resistance, this system isn't terrible.  Just test with the same wiring each time.

Pros & Cons

Pros

This is a sophisticated tester with (in theory) PC connectivity, internal resistance testing, and a wide range of supported batteries.  It's also very compact.

Cons

The pulsing of the battery doesn't lead to great test results.  And, the load is soldered to the device, so you can't change it out easily.  Having to manually switch modes for a high capacity battery seems a bit silly as well.

Conclusions

This tester does what it advertises, but it does so in a somewhat non-intuitive way.  Pulsing the output like this just isn't a good way to test a battery, and claiming you do a low amperage test when you just pulse a high amperage draw isn't really very honest.

It does calculate internal resistance of the battery, but if you care about that, you really should be using a 4-wire setup.

Could you fix some of the flaws with this unit?  Yes.  A large capacitor on the input side would go a long way to smoothing the current, and I might get around to testing this at some point.  But, really, in 2015, this shouldn't be needed.  There are better quality battery testers that don't need this sort of hacking to work.

You probably shouldn't buy this unit unless you really, really need cheap PC logging, don't care about a pulsed discharge, and can deal with the software being Chinese.