Showing posts with label Battery Packs. Show all posts

A Rant About Repairability and Proprietary Systems: Why Electric Bikes Need Rebuildable Batteries

It's the end of February, 2016.  The anti-Trump fortress of "Well, yeah, he's got some support now, but there's no way he can win the primaries" has been thoroughly overrun, and it's occupants are beating a hasty retreat to the stronghold of "Well, yeah, he's winning primaries, but there's no way he can win the general!"  Additional fallback positions may include "Well, he won the general, but he probably won't live to be inaugurated" and the rather dismal cave of, "Well, shit."

UK Censors, after being subjected to 10 hours and 7 minutes of literally watching paint dry in Charlie Lyne's "Paint Drying," were overheard saying, "It wasn't that bad.  It could have been footage from one of Hillary's campaign stops."


Cell Phones vs Electric Bikes

In another bit of news, an electric bike is not a cell phone or laptop.  One of these categories gets old beyond just the batteries, and one of these categories would remain perfectly useful indefinitely, were it not for battery packs dying (like this BionX battery from 2008).


iFixit is a company that does teardowns of shiny new tech devices, many of which are rather difficult to repair.  The vast majority of people don't seem to mind, and talk about how repairability is an obsolete concept, and besides, the device is slow and crufty in a few years anyway.

I find remarkably few people who care about repairability in 2016.  Which, I admit, works to my advantage.  I can turn a tidy little profit repairing phones, replacing batteries, and generally fixing things instead of throwing them away.  One man's trash...

That said, when it comes to phones, I mostly agree.  Technology keeps advancing, cell phones get slow at running the latest apps and websites, Apple doesn't update old enough devices (though I'm currently impressed - the iPhone 4S from late 2011 is on iOS9), and if you're an Android user, well, forget it - what it ships with is probably the only thing you're going to get.

I think this is a problem, but clearly billions of people don't.  At least you can get replacement parts & batteries for old phones.  If it was even a moderately popular phone or tablet, the parts to repair it are available.  Maybe not OEM, maybe out of some some little back alley factory in China, but you can get the parts.  eBay is wonderful for esoteric phone and laptop bits.

This "throw away device" approach to devices falls apart spectacularly when applied to transportation.  From my (admittedly biased) viewpoint, electric bikes are particularly bad about being turned into scrap before their time due to one part.

The "problem" with electric bikes (and electric vehicles in general) is that a bicycle doesn't get obsolete!  It may break and need repairs, but it doesn't get "obsolete" like a cell phone or computer does.  An electric bike from 2008 that worked nicely for transportation in 2008 still works nicely for transportation in 2016 - if you can power it.  The roads haven't fundamentally changed in the last 7 years - or even the last 70 years.

The same is true of other forms of transportation - a car from the 1940s or 1950s is still quite capable of running safely and at speed on today's roads, and bicycles from the 1920s or 1930s are perfectly useful today (a bit heavier than modern bikes, though I don't think today's carbon fiber bikes will be rolling in 2116).

The problem is that keeping an electric bike from 2008 (or earlier) running can be very, very difficult.  At best, if it's been used a lot (awesome!), the batteries are worn out from age and use.  More typically, the batteries are totally dead from sitting off the charger for 6 months or a year (or three).  This wouldn't be a problem if replacement packs were available, but they're not.  Seriously.  Go try to buy a new pack for a Trek Valencia Ride+.  Or a Schwinn Tailwind.  I'll wait.  They look like this.


Options for a Dead Battery

If your battery is a simple "Volts & Amps" style battery with no communication other than voltage, the solution is easy.  Go buy a new battery of similar voltage, connect it, and ride.  You'll either have more range for the same weight, or a lighter battery.

However, an awful lot of electric bikes from that era (and today is no better) have proprietary communication channels, fancy BMSs (that didn't do their job, like this Tailwind BMS), and are generally not easy to swap out for something newer.


This leaves a few options for people stuck with a dead proprietary battery:
  1. Scrap the bike.  Accept that you purchased a bike with a 3-5 year lifespan, and when it's worn out, you junk the whole thing.  Or replace all the expensive electric bike parts with new, also expensive electric bike parts.  Or just scrap the electronic parts and be left with a less-than-ideal bike for non-motorized use.  I think this is utterly absurd, but it's depressingly common.
  2. Try to find "new old stock" batteries that still work.  They exist, but they're often not in great shape either - at best, they don't have cycles on them but they still have years on them.  Good luck.
  3. Rebuild the battery pack.  This is what I do.  This is what Trek and BionX are making a very difficult process, and Schwinn has made basically impossible.
  4. Bypass the battery pack at some convenient point, and hook up external batteries.  This is what some other people try to do.  Depending on the system, it can work, but the BionX systems require opening the pack to do this, which can be very difficult.  This also requires internal batteries that hold a charge.  It's a valid hack for capacity loss, but it's not a safe fix for dead batteries.
None of these are amazing options for people who would like to keep bikes running, and many of them require specialized technical skills that are beyond what most bike shops are willing to do.

So, a simple request for those people designing electric bikes: Consider the people who will want to keep them running.

Keeping Electric Bikes Running

If you, as a designer of an electric bike, don't think anyone will want to keep your bike running in 5 years, then you must think it's a piece of crap, and you should ask yourself why you're selling it in the first place ("But Crowdfunding!" is certainly an answer, if a rather slimy one).

However, if you think you've designed a good enough bike or conversion kit that people will want to be riding it in 5, 10, 15 years - why are you making it difficult to repair?  Your batteries won't last forever in the best case, and they'll last a lot shorter in the common case.  If you've built a good bike, consider that people still ride bikes from the 50s and 60s, and design accordingly.  Make it easy for people who want to rebuild your packs!

I have no complaints about the downtube mounted BionX 36v packs.  They're reasonably easy to get apart, and rebuilding them is not a hard process.  BionX won't sell you a new battery for older systems - the best they'll do is offer you a loyalty discount on a brand new system (spoiler: they're not cheap).

The Trek Valencia Ride+ pack?  What were you thinking?  I see no reason whatsoever to use aggressive foam adhesive in holding this pack together.  Compressible foam would work just as well for holding the cells in place, without making it nearly impossible to rip open for rebuilding.

The Schwinn Tailwind pack?  Forget it.  They won't even talk to you.  Schwinn tells you to call someone who has nothing to do with building Schwinn's batteries, and Toshiba tells you to call Schwinn.  It's totally abandoned by everyone involved in making it, and it's got an oddball battery chemistry as well - lithium titanate, with a fancy, sophisticated BMS that nobody knows a thing about (except that they end up reliably not working).

I understand that the manufacturers are worried about liability, or lawsuits, or something.  Knock it off.  If it fails in warranty, it's your problem.  If it fails after that, it's someone else's problem, and if you think your product is any good at all, it's likely that they'll want to keep using it.  Don't get in their way.

Requests to Electric Bike Manufacturers

  1. When designing your packs, consider that they are a finite lifespan item on a bike that can and should last radically longer.  Consider end of pack life rebuilding when you're designing a pack.
  2. Provide full technical information on your packs when you no longer sell them.  If you're not selling them, you can't lose out on sales from third parties rebuilding, but you can make customers happy with your brand going forward.
  3. If you build a "kill switch" into your BMS for low voltage conditions, document how to revert it once the cells are replaced.  "Use the proprietary software random users cannot get" is not an acceptable option here.
  4. Don't design to prevent owners from using a third party battery pack in the long term.  It's fine if you don't interface properly with it, but at the very minimum, don't refuse to operate without the provided battery pack.  I should be able to put "Volts & Amps" across a set of terminals and have an operating electric bike.

Thoughts for Buyers

Ask about this before you buy an electric bike.  Consider that if you buy one, you may well want to keep riding it past the first battery lifespan.  If the battery pack is a glued together pile of proprietary nonsense only sold for a few years, you might not be able to do that.  And, even if there is someone who can rebuild it, you'll pay more and get back a pack that has been pried apart with excessive force.  It's not an appealing situation, is it?

This really is something to consider if you're buying an electric bike.  I love the nicely integrated stuff, but if you want to keep it running for a few decades, the cheap parts out of China are simply better.  They interface over a well understood set of unofficial standards, and they interoperate surprisingly well.  Volts & amps go in, forward motion comes out.  You can mix and match parts at will.  Is it as nicely integrated?  No.  But it'll be poorly integrated and functional while rolling down the road under it's own power, which is better than you can say about a BionX system with a dead battery.

If you're stuck with a dead ebike, I'd love to hear about it in the comments.  I care about keeping older stuff running, and I'm slowly building my list of packs I can successfully rebuild.  If you've got a pack I don't know, I offer a nice discount on the first rebuild of a new type, if I can rebuild it.

Trek Valencia Ride+ BionX Battery Pack Rebuild

It's near the end of January.  Oil is back over $30, Bitcoin is (yet again) doomed, and I've just spent the last two posts detailing a teardown of a Trek Ride+ Valencia battery pack.

If you haven't read them, you really read both to understand where this post is coming from.  It's hard to appreciate the rebuild without understanding the horrors of the teardown.

Trek Valencia Ride+ BionX Battery Pack Teardown: Part 1
Trek Valencia Ride+ BionX Battery Pack Teardown: Part 2


And now, I'm going to rebuild it.  Read on, because you know you want to see what happens!


Rebuild Overview

This rebuild is going to be a little bit different from my previous ones.  I'm not exactly duplicating the previous pack design, but instead using a different cell layout.  

The original pack is 4P11S - sets of 4 cells wired in parallel, then 11 of these sets in series.  I'm going to rebuild this pack as 11 cell series sets, and then wire the 4 of these in parallel.

There are several reasons for this.  The first is that I saw what happened to the 4P11S pack with the horror show of negative voltages across many of the parallel groups.  I haven't seen this on the other BionX packs I've torn down (which were series then parallel), so I'm inclined to go with the layout I know works.

The second reason is that the 4P11S layout is actually very difficult to build, and rebuilding it would be incredibly tricky.  Since there are 4 groups of 11 cells, doing them series then parallel makes it radically easier to build.

Finally, I reduce the resistance losses in the nickel strip significantly, since instead of the full pack current flowing through the nickel strip, only 1/4th the pack current is flowing through the strip - so losses are 1/16th (P=I^2*R).  Nickel is not the most conductive material on the planet, so reducing the losses there should help with the range.

These combined to make it, in my opinion, worth rebuilding the pack differently.

I keep the chemistry the same, using 2250mAh Sony US18650V3 cells to replace the 1600mAh Sony US18650V cells.  This means a 9Ah pack instead of a 6.4Ah pack, though!

Function Check

This pack is a newer CANBus pack.  I've heard about problems with them not working after a rebuild, so I set out to find out as much as I can about testing them first.  I obviously can't just stick it on a bike to test, since the batteries are stone dead.

What I found out is that on both the I2C and CANBus packs, shorting pin 3 to the nearest large pin (the negative terminal) will turn the pack on.  You get a few beeps out of it, and while I can't test detailed functionality, it's enough to verify that the BMS isn't totally dead.

Fortunately, for a two lead BMS (positive and negative), I can simulate a healthy battery without too much trouble.  Set my DC power supply to something in the pack voltage range, hook it up, and check it out!

Please note: I am NOT trying this with the battery attached.  The battery (which is stone dead) has been removed, and I'm testing with the bare leads to the BMS.  I'm not trying to charge the battery.  Don't do this and try to charge a stone dead battery, because it's not safe.


The BMS seems good!  It beeps at me and the tail light comes on.  This is about as good as I can hope for!

Building the Modules

To rebuild the pack the way I want to, I need 4 11S modules.  Things start, as they always do, with a box of batteries.


To line the cells up, my welder helpfully came with a cell jig.  I don't actually know where to find these as standalone objects to purchase, but they are most certainly useful!  Once they're lined up, the hot glue gun comes out and they're glued together.


A bit more hot glue later, and all 11 cells are attached firmly to each other.  This is a remarkably strong cell configuration once glued together.

The pack didn't come glued together.  It relied on the welded strips to hold the cells together.  This worked fine, but I prefer things to be stronger (and the configuration will be different, so I can't rely on the stripping for structural strength).  Glue it is.


Once things are glued together, the spot welder comes out and the strip gets welded in place.  You'll notice I'm using the trapezoidal ends on the strips again.  This is to prevent the sharp corner from punching through the positive protectors and shorting to the negative casing.  That's just too exciting for my taste.  I'm a very boring person when it comes to shorting out batteries.

Once both sides are welded, I've got a 11S cluster ready to go, except for the end tabs.  If you're doing this, please be sure you don't reverse the direction of the tabs on one side and end up with a bunch of dead shorts between two cells.  You'll only get through the first one, but I hear that it's also incredibly exciting.  Something about venting, flames, thermal runaway, and a really bad time.


Finally - all 4 modules are welded up and ready for the next step.


Connection Tabs & End Insulation

Despite what some people insist on doing, you can't solder directly to 18650 end caps.  All the manufacturers say not to, and it dumps a lot of heat into the cells that shouldn't be there.  I can touch one of the ends immediately after welding to it and it's faintly warm to the touch.  You might not want to try that with soldering onto the battery.

So, I need connection tabs to solder to.  I also need to insulate these things very well.

At the top of the picture, you can see two strips of insulating paper used to insulate the ends of the cells.  At the bottom, in red, is my connection tab protector.  This adds a layer of protection between the connection tab and the plastic wrapper around the negative terminal.  A short here is bad, so I want to ensure it won't happen.


With the tab on, you can see how it's protected by the thick insulating paper.  Once the wire is soldered on, I'll add more hot glue to keep this from moving at all.


The negative terminal doesn't need the additional protection.   It's already soldered to the case, so the only thing it can rub through to is what it's already connected to.  I'll secure it as well once the pack is assembled, though.


A bit more insulating paper, and the first layer is complete.


However, for the sake of redundancy and not having pack failures, I'm adding another layer.


There are now two full layers of insulating paper on each side of the module.  They'll face each other, so there are four layers plus whatever is holding the modules together.  This should prevent any shorts.  I do try to overbuild the packs because they're going into a rough environment - bicycles are not a particularly gentle method of transportation, and I intend my packs to last, safely.


Pack Assembly

With all the modules done, it's time to assemble them into a pack.  This is how they need to go.


I searched for something that would hold the modules together firmly, but also would have a slight cushioning effect on vibration.

My double sticky 3M trim tape proved perfect.  It's an incredibly sticky double sided foam tape that I use in a variety of projects, and still have a huge roll of.

Two strips of it between each module looks like it'll work perfectly.


A quick test fit before I expose the second adhesive side, and things fit wonderfully!


Excellent.  One nicely stuck together pack.  This thing is properly solid.


Crimp Connector Experimentation

The final step in the pack build is wiring up the connections.  This requires coming from 4 tabs on each side to a single wire going into the BMS.

I'm not worried about the current - each module will only take 2-3A total.  However, I do want to ensure I have a strong, safe, robust connection.  And nothing works better than experimentation.

This is what I'm starting with.  Two wires on one side, one on the other, and an uninsulated crimp connector barrel.


It turns out that this actually works perfectly for what I need.  The crimp barrel is oversized for the wires, but as it crushes, the single wire remains in the bottom and the two incoming wires slide off to the sides.  With a bit of careful crimping and forming, there's a tight round connection that holds all the wires very firmly.  This is exactly what I wanted - but it's still not insulated.


Fortunately, heat shrink works perfectly.  This is a nice bit of adhesive heat shrink tube and it insulates perfectly.  As it heats up, the glue inside melts, and when the heat shrink cools, it glues to the wires, ensuring it stays firmly in position and isn't going anywhere.

For the actual pack, I'll double heat shrink the connections.  There's plenty of room.


Electrical Wiring

I've started building the actual pack wiring now out of 14 gauge wire.  These are the junctions on the positive side, and are crimped and have a double layer of heat shrink tubing on them.  They should be fine.


And the connections are installed and heat shrunk.  I'm using a 4-2-1 join, much as you'd find on a nice exhaust header (I may rebuild ebike packs, but I'm still a car guy)!


The negative side is wired up similarly, but is "backwards" compared to the postitive side.

After the wiring is in place, the hot glue gun comes out again to secure the wiring against vibration and motion.  Hot glue is cheap, and I don't want things moving in relation to one another.


It's alive!  I've done the final 2 into 1 connection with crimp connectors of a different variety, and they're heat shrunk down.  The negative connection includes the thermistor, which will be properly placed later.


As a final step before inserting the pack in the housing, the top of the pack (where it faces the BMS) gets two layers of insulating paper.  If you get the idea that I don't want things shorting out, you'd be correct.


The new pack snug in half the casing.


And, about an hour later, I got here!

The pack is back together, tested as far as I can test it, and seems to work.  Getting it together involved removing a lot of the black goop that held things together initially.  It was a process of "Fit things, find what doesn't fit, remove some goo, repeat."  And, eventually, it's back together!

The pack isn't quite as water tight as it was - I did discover some rubber o-ring type material in the groove.  But, it looks like it works, and it should be a nice upgrade over the stock pack!


One other random thing I've learned: If the pack is chirping, warbling, or otherwise making a slightly disturbed alarm like noise every half hour or so - it needs charging!  This is it's "Please charge me..." alarm.  If you're hearing a random noise, can't identify it, and have one of these packs - plug it in, please.  Dead packs are no fun.

Thoughts & Conclusion

This pack is a pain in the ass.  There's no other way to describe it.  It's incredibly difficult to get apart, and it's a very non-trivial pack to rebuild.

I really don't understand why BionX went this way with the pack.  A bunch of foam padding would have worked just as well to keep the pack in position, but wouldn't have made this brutally difficult to get apart.  The layout is a transition between their early packs and their later packs with a full BMS (where you do need the parallel groups), but it doesn't seem to have worked well, based on the horror show of negative voltages.

I'm glad it's back together.  One down, one to go.

If you have one of these and it's dead, at least you know it's rebuildable.  Though, it's not going to be cheap.  The labor required to rebuild this pack is very significant, and the pack will never look the same again.

Trek Valencia Ride+ BionX Battery Pack Teardown: Part 2

If you missed part 1 of the Trek Valencia Ride+ battery pack teardown, you should go read that first.

To recap: A battery pack, bound together by a lot of adhesive, difficult to get apart, and I didn't feel like pulling the actual battery pack apart after I got it out and discovered it was a corroded mess.

Now I'm going to dive into the corroded mess and see if I can figure out what's going on.


Read on to join me for a lot of battery pack photos!


The bulk pack voltage is a whopping 0.421v.  This pack is dead, Jim.  It's not even nailed to the perch.


The positive end is covered with some black plastic insulation.  Not for long!  A bunch of chipping away of brittle plastic, and I've got... this.


It's pretty clear what they've done at this point.  The pack is 4P battery strings, connected together in an interesting manner, with a lot of custom cut nickel strip and additional wires to bridge things to the next set of 11 cells where needed.

I think someone wanted an excuse to play with their shiny new custom nickel strip cutter, though.  There are a lot of different strip shapes for this one pack.

I like the use of fiber insulation under the nickel strips.  This is a definite evolution on the earlier packs.

The positive wire is soldered to the nickel strip, clear of the positive terminal.  Excellent.  This means they're not dumping heat into the battery trying to solder directly on top of it.  With the heat shrink removed, I can just desolder this and make my life easier.

Also, you can (barely) see on the top cells that there's a slit in the nickel strip over each cell.  This improves the welding, and allows for a better weld joint with less current (as it forces all the current to go through the weld points and the end of the cell, instead of just bypassing through the strip).


With the cell chunks separated, the pack arrangement becomes clear.  It's functionally just a long pack that's been folded, with the connections bridged as needed using large wire.  If you imagine straightening out the pack, the ends currently connected with the white wires would be touching, and would be able to be connected with nickel strip like the joints are.  It's a 4P11S pack, bent up into a weird arrangement.


Taking a closer look at the corroded end... it's just gross.


So, of course, I'll start at the other end.

The heat shrink comes off the bridge wire, and... ew.  That's not a great looking solder joint.


This is the same solder joint after I took a while trying to remove it.  I understand why it's not great - the huge wire just sucks all the heat out of the joint, and it's basically impossible to heat it up enough to flow solder.  I don't actually know why they used such a large wire gauge for these connections.  It's really not needed.  The thin bit of nickel strip is the high resistance point, not the wire.


So I just snipped the end off.  That's fine for a pack teardown.

You can see some of the teardown progress here.  That plastic insulation is a royal pain to get off!


Another set of neat shapes here in the custom cut nickel department.  Though, I admit I have no idea why they didn't just use a sheet.  I guess if you're cutting the slits in the middle, you may as well cut other stuff?

It still feels to me like someone got their hands on a super fancy nickel strip cutting machine and set out to justify it, though.


About this point, while I was chipping the black insulation off, I thought about how nice this would be to work on in the summer, with all the heat so the plastic isn't brittle.  About this time, I had to move my leg away from my dual 500W shop lamps before they singed hair off.  Fortunately, I can do synergy with ideas and conclude that I have a great heat source for heating the plastic.  And this made things much easier.

LED work lamps are nice, but there are some things that 500W of halogen fury is better suited to, and this is one.  Once warmed up, the insulation came off much easier!


So, I kept going.  The endless variety of nickel strip patterns are entertaining, if a bit annoying from a "I'd like to actually rebuild this pack" point of view.


And, it's time to get some details of the corroded end.

It's really, really nasty.


I've got the pack totally unfolded now.  And I am incredibly curious about these corroded cells.  So, out comes my voltmeter!  I hook it up...

... and then double check that I'm testing it the correct way.  You know, red to positive, black to negative.  Then scratch my head and test again.  Nope.  Still showing -276mV.  Negative.  This set of cells is 3v below the minimum recommended voltage of 2.7v.


And they're gross.


Oh, yes.  The green wire running along with the negative wire goes to a thermistor.  So it's just like the other BionX packs I've worked on.


Per Cell Voltages

After seeing the horror show of negative voltage, I wanted to see what the other cells were at.  So I tested.  By parallel cell region, starting from the negative side:

-1.1mv, -197mv, -280mv, 1.0v, -0.5mv, -1.2mv, 0, -0.4mv, 0.2mv, 0, 0.676v

That's an awful lot of negative voltage in there.  Only two regions are above zero by any meaningful amount.

How does this happen?  It involves discharging a cell, then forcing current through it after it's drained, and not in the useful charging direction.  If a set of cells is weak, this can happen if you keep draining a pack (and the BionX BMS absolutely does keep draining a low pack).  It can't happen from self discharge, as far as I understand things - it has to involve an external load.

But, in any case, the pack is quite dead.

Pack Summary

This pack is a 4P11S pack using the same Sony US18650V cells as the older BionX packs.  In contrast to the older packs I've worked on (which are series strings paralleled together), this is a bunch of parallel strings in series.  This is a more standard pack arrangement, especially when you use a BMS that allows for balancing and low voltage cutoff for each voltage region, not just the global pack voltage.

Which this pack isn't using.  I hear the newer 48v packs have a proper BMS, and I look forward to tearing one down in a few months if all goes well.

As to what killed this pack?  I'm not sure.  Either a loss of capacity caused the cells to get driven too low, or they got out of balance.  In either case, it probably got worse as time went on.

This is the downside of not having anything but a bulk voltage sensor - you can't detect things like this early.

I'm impressed with the Sony cells, though.  Despite this abuse, they didn't do anything harmful.  There's no evidence of heat in the pack.

I'd like to test the cells and see what sort of capacity they have left after this abuse, but I'm not going to do that until I have a place I can safely have batteries run away.  So, don't expect that set of tests for a while.

Fortunately, some testing shows the BMS is still alive and responsive (for at least sanity check levels of alive), so I can rebuild it.  But that's a future post.
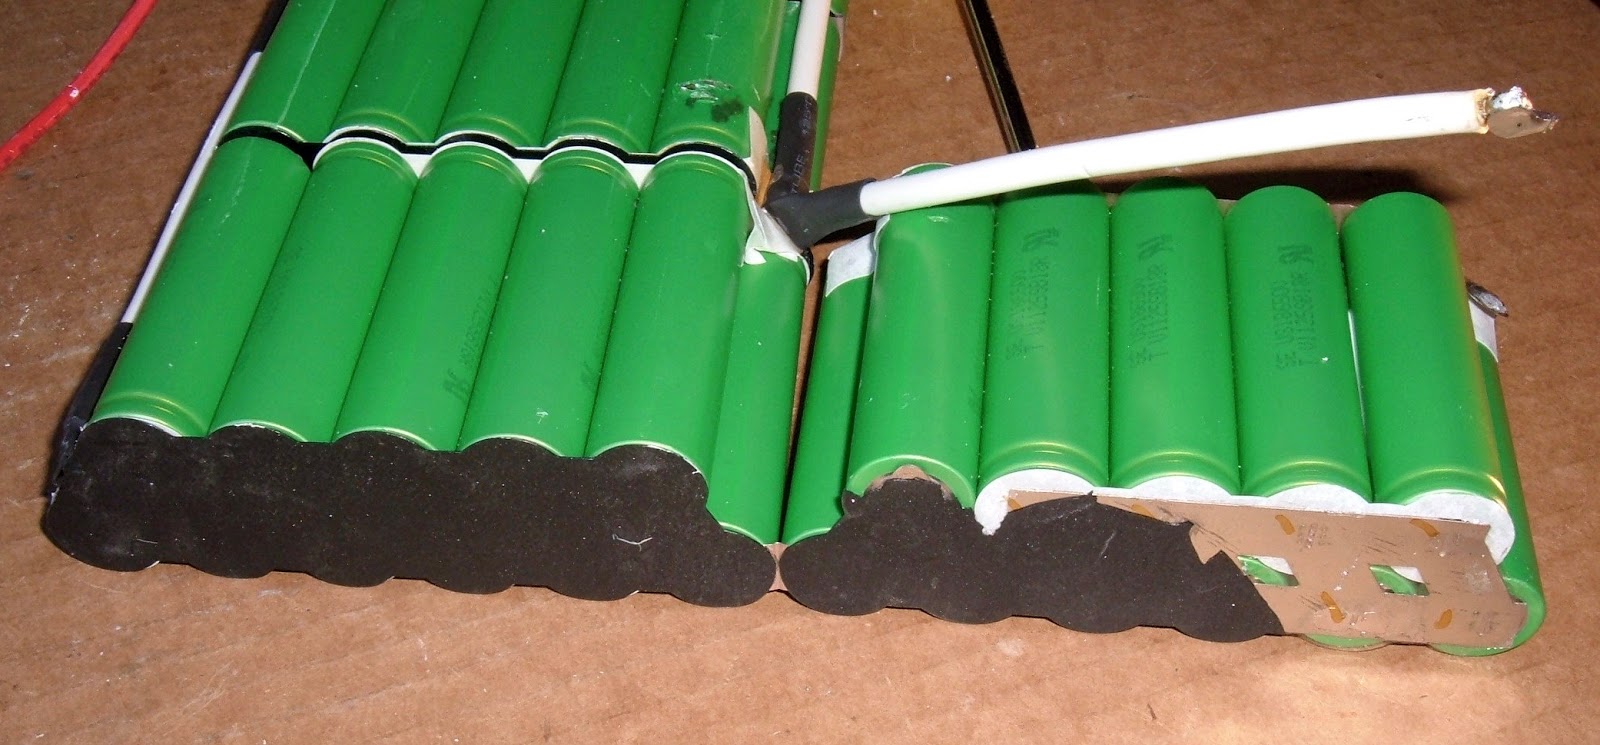
... seriously, negative voltages.  That's just not right.  Especially not this many.

Curious as to how I rebuilt it?  Keep reading!  Trek Valencia Ride+ BionX Battery Pack Rebuild